Table of Contents Jump through this article
Installing Home Assistant on Ubuntu
NOTE: This post has been updated on May 26th to use Docker-CE instead of Snap.
Home Assistant has stated they will no longer support this installation method but there currently is no other way to use external storage.
I recently upgraded my Home Assistant server to an Intel NUC 10 Performance Kit (NUC10i7FNH) from an Atomic Pi. I needed to manually install and configure Ubuntu on my hardware there is an issue where you cannot boot from the NVMe drive. and I wanted more control over secondary storage and services.
If you are looking for hardware recommendations to run Home Assistant or a small server on please check out Upgrading Home Assistant Hardware.
Updating Firmware
It is always a good idea to update to the latest firmware of any device you purchase before starting to install the Operating System (OS). Firmware upgrades can add additional features, hardware support, or fix bugs that could cause installation failures.
I started by navigating to the Intel download center
and searching for my model number (NUC10i7FNH). I clicked around until I
found a page talking about available Bios updates. In my case it was called
BIOS Update and Recovery Instructions
and contained detailed instructions on how to update the Bios.
Operating System
If you are only using Home Assistant and don’t plan on running any other
services on your machine than I’d recommend just using
Home Assistant formally known as
hassio. This will be automatically updated and managed for you, reducing your
maintenance which is always a good thing!
Since writing this article, Home Assistant has dropped support for Ubuntu and only supports Debian. I HIGHLY recommended to use Home Assistant OS.
However, if you run want to run extra services on your machine like facial/image recognition software you’ll need to install Home Assistant on an existing Operating System (OS). Additionally, there may be software or driver limitations with the Home Assistant images like the issue with not being able to boot from the NVMe drive that will force you to install on an existing OS.
I use the Ubuntu Server LTS server images instead of Windows for the following reasons:
- The software is open source, free and used by many.
- Active community support.
- Ubuntu Server is light weight and works on many different hardware
architectures (e.g.,
x86,arm). - LTS images are supported for long period of times and updating is a breeze.
- Documented installation steps for Home Assistant.
After you download latest Ubuntu Server LTS from the Ubuntu site. We need to image an MicroSD card or USB Flash Drive) with the downloaded image. I use Etcher to format the drive with the downloaded Ubuntu image (iso).
Install
After inserting the imaged flash drive or MicroSD card into the computer, I follow the standard install process for Ubuntu. I use the recommended settings for formatting and partitioning the primary NVMe drive.
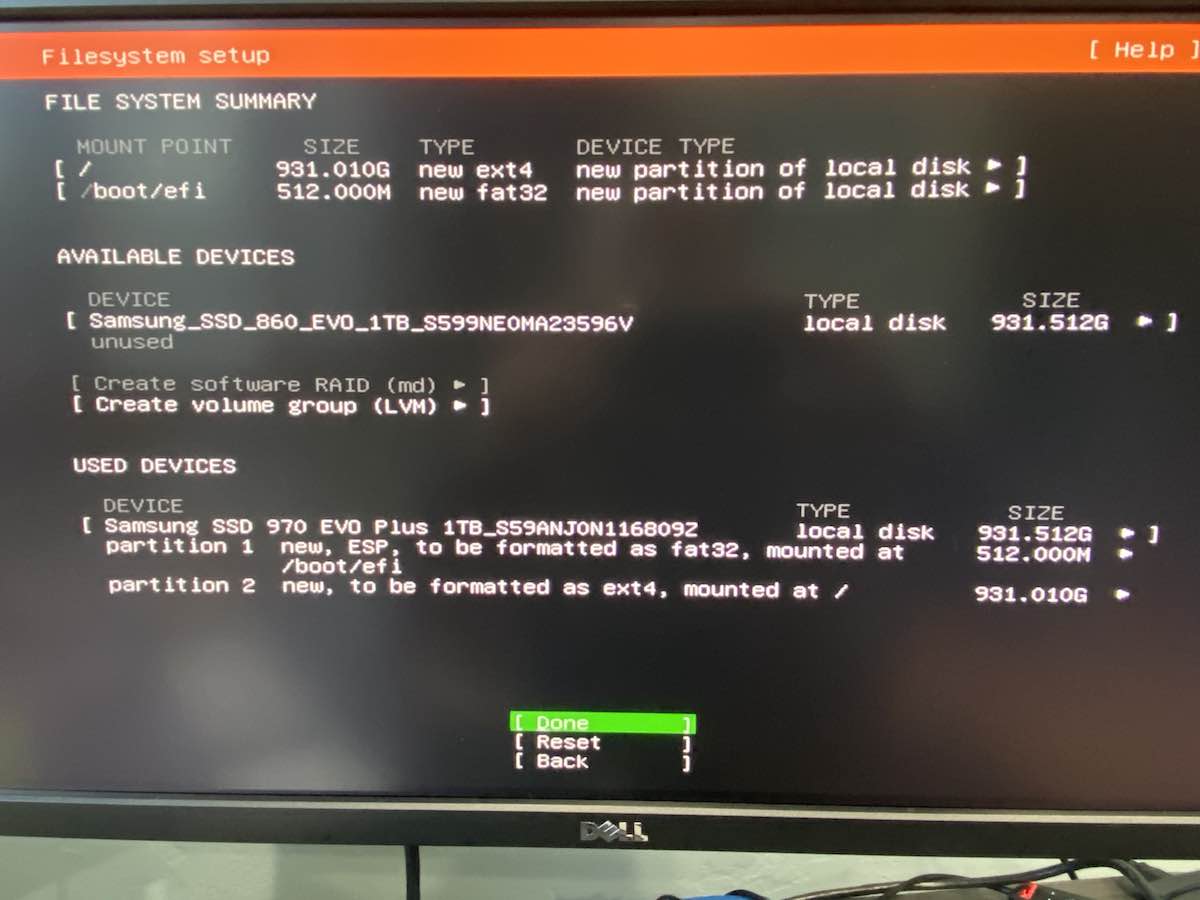
I could also format the secondary drive during this step. But I always tend to just format the secondary drive later as I can then immediately configure the mount points after formatting the secondary drive.
I always install and configure SSH when prompted. This makes it so much easier to complete the install below using your main computer so make sure to import your SSH identities when prompted.
After the installer reboots the machine, you can ssh IP_ADDRESS into the
machine and use your primary computer to finish the install. Please remember to
replace IP_ADDRESS with the machines IP Address. You can get the IP Address
by resolving the hostname you gave the machine during setup, looking in your
router settings, or by running the following command:
hostname -IJust grab the first IP Address in the list of results.
You can also continue the steps below directly on the machine if you didn’t configure or know how to use SSH. Here is a beginners guide to SSH.
Next, the steps below require sudo to
execute privileged statements from the
terminal.
sudo -sOptional: Enable Canonical Livepatch Service
The Livepatch Service allows you to apply
critical kernel patches without rebooting. Which lowers the amount of time
maintaining my install. You just need to get a free Livepatch key and enter in
the commands below (remember to replace KEY with your Livepatch key).
snap install canonical-livepatchcanonical-livepatch enable KEYOptional: Format and mount secondary storage
I always install a secondary storage device to place my backups and other data on. I feel like this helps protect me from boot drive failures and makes my life easier as all I’d need to do is replace or reformat the failed primary drive and I’d still have access to my backups locally.
The following steps work for any storage devices (e.g., SSD or MicroSD). I feel like every time I need to format a drive in linux it’s been so long that I forget how to and then I spend forever figuring out how to do it. This time around I came across this awesome guide which I’ll follow below with some tweaks.
I want to access the drive by a friendly name via /mnt/data after it’s been
formatted. For this to happen we first need to create that directory so in the
following steps we can mount our storage device to this folder.
root@nuc:~# cd /mntroot@nuc:/mnt# mkdir dataNext, we need to get the location of the new drive by executing the statement
below and looking for the logical name which in my case is /dev/sda.
root@nuc:~# lshw -C disk *-disk description: ATA Disk product: Samsung SSD 860 physical id: 0.0.0 bus info: scsi@2:0.0.0 logical name: /dev/sdaNext, we need to create the GUID Partition Table (GPT) and enter in Yes to
the prompts when asked.
root@nuc:~# parted /dev/sda mklabel gptNext, we need to create the partition label
root@nuc:~# parted --align optimal /dev/sda mkpart primary ext4 0% 100%Next, we need to create the partition
root@nuc:~# mkfs.ext4 /dev/sda1Next, we need to get the drives UUID identifer so we can safely mount it. If
you have a few in the list, we are looking only for our drive we’ve identified
earlier (e.g., sda1).
root@nuc:~# ls -l /dev/disk/by-uuid/total 0lrwxrwxrwx 1 root root 10 Mar 9 02:40 87f48668-003f-42b2-b9b9-d588093c7d22 -> ../../sda1Next, copy the UUID from the previous command (in my case
87f48668-003f-42b2-b9b9-d588093c7d22). We’ll need we need to update fstab
to mount our device on boot.
root@nuc:~# nano /etc/fstabOnce this text editor is open, navigate to the end of the file and add the
following line replacing my UUID f58e18af-1fb2-4186-92f6-702c081a757e with
your own.
/dev/disk/by-uuid/f58e18af-1fb2-4186-92f6-702c081a757e /mnt/data ext4 defaults 0 0Once this has been added press the control+o, then press enter key to
confirm and finally control+x to exit nano.
Next, we can remount everything defined in /etc/fstab without rebooting by
running the statement below.
root@nuc:~# mount -aSomething that I struggled with in previous attempts was knowing what device a
folder was stored on. I
came across
this awesome little command df that can confirm that /mnt/data is located
on the correct storage device (/dev/sda).
root@nuc:~# df /mntFilesystem 1K-blocks Used Available Use% Mounted on/dev/nvme0n1p2 959862832 10726424 900308248 2% /root@nuc:~# df /mnt/dataFilesystem 1K-blocks Used Available Use% Mounted on/dev/sda1 960379920 77852 911447644 1% /mnt/dataAs you can see the parent folder /mnt is on my primary NVMe drive, while
/mnt/data is located on our recently configured SSD drive (/dev/sda)!
Optional: Place backups on secondary storage
If you don’t have a second drive already configured. Please install one and follow the steps above for formatting and mounting secondary storage before continuing.
NOTE: You can allow store the
addonsfolder on a secondary drive following the same steps below but replacebackupwithaddons.
We need to create a our backup directories for Home Assistant by running the commands below.
cd /mnt/dataroot@nuc:~# mkdir /mnt/data/backuproot@nuc:~# mkdir /usr/share/hassioroot@nuc:~# mkdir /usr/share/hassio/backupNext, we’ll need we need to update fstab to automatically mount our backup
folder on boot.
root@nuc:~# nano /etc/fstabOnce this text editor is open, navigate to the end of the file and add the following line
/mnt/data/backup /usr/share/hassio/backup none defaults,bind 0 0Once this has been added press the control+o, then press enter key to
confirm and finally control+x to exit nano.
Finally, we can remount everything defined in /etc/fstab without rebooting by
running the statement below.
root@nuc:~# mount -aInstalling Home Assistant
This step installs Home Assistant following the Generic Linux Host Guide.
apt-get update && apt-get upgradeapt-get install -y apparmor-utils apt-transport-https avahi-daemon ca-certificates jq curl dbus network-manager socat software-properties-commonsystemctl disable ModemManagerapt-get purge modemmanagerNext, follow the installation documentation for installing Docker-CE and then run the scripts below to finish installing Home Assistant.
curl -sL https://raw.githubusercontent.com/home-assistant/supervised-installer/c674830d8ddc6af9d618755a7995af939dd73fde/installer.sh | bash -sIt might take a minute or two for Home Assistant to get up and running. It has to download all of the docker containers from the docker registry and then run the containers.
If you want to know more about docker I’d recommend watching this video.
You can access your Home Assistant install by navigating to
http://IP_ADDRESS:8123 in your browser of choice. Please remember to replace
IP_ADDRESS with the machines IP Address. You can get the IP Address by running
the following command:
hostname -IJust grab the first IP Address in the list of results.
It’s highly recommended that you configure your router to give this machine a static IP Address. This ensures that the IP Address doesn’t change when the machine reboots.
Optional: Restore from previous backup
The first step is to create and download a backup from your previous install. Once this is done we need to transfer it to the new machine we just configured.
Create a new temporary Home Assistant account if you haven’t done so already and install the Samba share official Home Assistant add-on by navigating to http://IP_ADDRESS:8123/hassio/addon/core_samba.
Next, configure a password in configuration and click the Save button. Then
click the Start button to turn on the Samba add-on.
Once it’s up and running you need to connect to the Samba share and upload
the downloaded backup to the backups folder.
If you’ve never connected to a Samba share before then please watch one of the following videos:
Next, navigate to the http://IP_ADDRESS:8123/hassio/snapshots snapshots page
and click the refresh icon in the upper right. The snapshot will be listed in
the available snapshots. Click on the snapshot and then selected
Wipe & Restore.
After a few minutes home assistant will restart and you’ll have all of your existing configuration and addons from your previous install!
Optional: Configure Z-Wave Integration
If you are using Z-Wave, you’ll also want to update your
Z-Wave configuration
usb_path. If you haven’t done so already plugin your Z-Wave controller
(e.g., Aeotec Z-Stick Gen5)
into any usb port and run the following command to get the USB UUID.
root@nuc:~# ls /dev/serial/by-id/usb-0658_0200-if00The command returned usb-0658_0200-if00 a UUID for my USB device.
Next, we need go and update the Z-Wave configuration yaml using your favorite editor.
zwave: usb_path: /dev/serial/by-id/usb-0658_0200-if00If you configured Z-Wave using the integrations page, you may need to remove and readd the integration in order to set the USB Path.
Finally, save the configuration file and restart Home Assistant to pick up the new configuration settings.
.